UtilitiesVS Code
Jupyter is geared toward producing documents which interweave exposition, code, and visualizations. Dedicated editors provide more features for writing large codebases, and it's worth learning enough about them to make an informed decision about when to switch as a project scales beyond the sweet spot for Jupyter.
The editor we will use is the free and open source Microsoft product Visual Studio Code, or VS Code for short. VS Code has risen sharply in popularity since its introduction in 2015, reaching the top of the ranks in the 2018 StackOverflow Developer Survey. It starts quickly and offers many powerful features, including a system for users to add their own extensions. This combination of popularity and extensibility means that extensions are available for almost everything, so users can often comfortably use VS Code for all of their editing tasks (for example, authoring in Markdown, LaTeX, etc., and doing web development, Python development, data exploration, etc.).
Main Features
Let's do a walkthrough of some basic VS Code features. We begin a VS Code session by opening a project folder (although you can directly open specific files, we recommend opening the project folder first, because some features are designed with this workflow in mind).
File Navigation. When you open a project folder, the Explorer pops open on the left side of the window. In the Explorer you can navigate the directory tree and do common file operations like adding new files, moving them around, and re-naming them. Right-clicking a file or folder brings up the available options along with keyboard shortcuts so you can learn to access them without having to right-click in the future. Clicking on a file opens it in the main window to the right. You can hide the Explorer to create more space for the main window with
cmd-b.
Command Palette. VS Code has enough functionality that it would be inefficient to access all of it through menus and infeasible to assign and remember keyboard shortcuts for every operation. The Command Palette is a way to find functions quickly based on descriptive names of those functions. For example, if you want to replace one string with another throughout a file, you can do
cmd-shift-Pand start typing "replace". Use the arrow keys to select the desired function and hitenterto run it. Note that the Command Palette displays keyboard shortcuts if you want to learn them. However, the Command Palette is fast enough that you might want to use it instead of keyboard shortcuts as your primary way of accessing some functions.
Integrated Terminal. VS Code has an integrated terminal that you can pop up and down using
ctrl-`(that's a backtick, top left corner of the keyboard).
Marketplace. Much of VS Code's functionality is provided through extensions, which are third-party packages provided in the VS Code Marketplace. The Marketplace can be accessed using the square icon on the left side of the window. You can search for and install extensions with a click, and you can right-click the gear icon on an installed extension to edit the settings for that extension. You'll want to go ahead and install the Python extension.
Bookmarks. When you're working with a large file, you'll often want to save your place so you can inspect a different part of file and quickly get back to where you were. VS Code has a bookmark system to facilitate this kind of navigation:
cmd-opt-ksets or removes a bookmark on the current line, andcmd-opt-jandcmd-opt-lnavigate through the bookmarks forwards and backwards. You can also use bookmarks to highlight large blocks of text for copying or deleting; try "Bookmarks" in the Command Palette to see all of the available options.
- Git Integration. VS Code provides a graphical user interface for performing common Git operations like staging and committing changes and resolving merge conflicts.
Suppose we've just run git merge from the command line, and conflicts were introduced in the file setup.py. We can resolve these conflicts and commit the resolutions all in VS Code:
Snippets. If you want to save time writing boilerplate code or text, you can bind chunks of text to short key sequences using VS Code's snippet mechanism. For example, you can enter a Markdown code fence if you have a snippets file with the following entry:
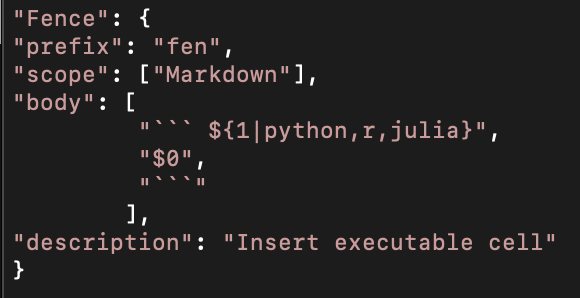
The dollar-sign expressions indicate points where the user is prompted for text when the snippet is triggered. These points are visited in order starting from $1, with $0 indicating the location of the cursor when the snippet is exited.
Many extensions come with snippets, and you can create your own by creating a new global snippet configuration file by searching in the Command Palette for "Configure User Snippets".
Exercise
- One of the advantages of doing Git operations in VS Code is that
. - The quickest way to look for a VS Code function you want to run is usually to use
. - If you want to run a shell command, it's faster to
. - To quickly find your place again when you have to navigate to a distant point in the file you're editing,
.
Python IDE
An integrated development environment (or IDE) is a full-featured environment for writing code. Advanced features that distinguish an IDE from a plain text editor include autocompletion, variable inspection, debugging, and
The most popular extension in the VS Code Marketplace, the Microsoft-supported Python extension, effectively turns VS Code into a full-fledged IDE for Python. Let's take a tour of the most important features. Begin by opening a new buffer (cmd-n) and switching to Python mode (click on "Plain Text" in the bottom left corner and choose Python from the menu). It's important to
Code execution.
shift-entersends the highlighted text to a kernel for execution. Lines containing#%%can be used to split your code into Jupyter-like cells, so you don't have to highlight the whole block you want to execute. We recommend that youuse a Jupyter kernel rather than a Terminal for code execution.Code completion. When you begin typing a name in a Python file in VS Code, you will see suggestions of Python names which begin with the letters you're typing. You can hit tab to select the top recommendation or use the arrow keys to navigate through other options. (Note also that when you open parentheses to make a function call, documentation for the function pops up to help you remember its arguments.)
Variable inspection. Above the Jupyter pane is a variable inspector where you can see the variables which are currently in scope. Arrays and other compound data structures can be opened in a special Data Viewer window (using the icon in the rightmost column in the variable inspector).
Debugging. VS Code provides several tools for inspecting the execution of a Python program as it runs. These tools are organized in a unified interface called a debugger. To debug a Python file in VS Code, begin by clicking in the gutter (the region left of the line numbers) to place red dots indicating breakpoints on specific lines where you would like to pause the interpreter. Then click the bug icon in the panel on the left. In the Watch section, you can any expressions whose values you would like to be able to monitor as the debugger runs. Press the green play button to begin debugging, and use the controls to navigate.
Refactoring. Highlighting an expression and right-clicking brings up a menu which includes the option "Extract Variable". Selecting this option will replace the given expression with a variable name and insert a line which binds the value of the highlighted expression to the variable. Using this tool to perform the refactoringn operation makes mistakes less likely and saves you a little time.
Linting. When you save a Python file in VS Code, a
linter is automatically run. Its suggestions are indicated by squiggly red underlines which you can mouse over to read the details for.Testing. VS Code provides support for
pytestfor unit testing. The process is designed to involve minimalboilerplate : you write test functions whose names begin withtest_in files whose names begin withtest_, and VS Code will discover them for you. From the command palette, run "Python: Discover Tests". The first time you run this command, you'll need to configure it. Just select "pytest" and follow the instructions.
After VS code has discovered your tests, you can run all tests with a button at the bottom of the window. You can also run individual tests using a button which appears in the editor above the function.
Exercise
- If you want to understand an algorithm by implementing it in Python and watching it execute line-by-line, you can use the
feature of VS Code. - NumPy arrays can be difficult to read in the format in which they are printed by default at the command line in Python. To see an easier-to-read version, use
. - Replacing a repeated expression with a variable is an example of
. - To send Python code to the kernel for execution, do
. - Identifying style improvements in code is called
. - To write unit tests in Python using
pytest, you just have to write functions that begin within files that begin with .